To someone who loves books, relocating is not just about moving items but also about maintaining a valuable collection full of memories, knowledge, and stories. Books are cumbersome, delicate, and sentimental since they are susceptible to damage when packing and moving.
Prepare to put a check on your moving house checklist as we guide you through the proper method on how to pack books for moving: from preparation and selection of the best way to pack books to using the correct book moving boxes and avoiding the most common errors.
These moving tips will certainly help you to keep your collection secure and unpacking a pleasure.
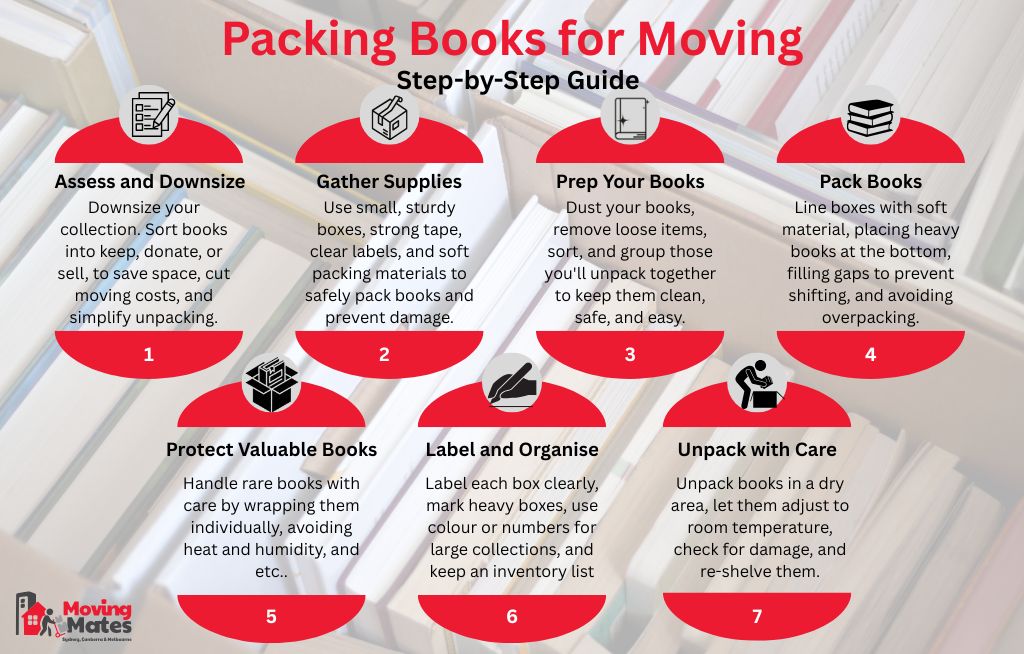
How to Pack Books for Moving: Step-by-Step
It would be easy to assume that dealing with books is all about simply packing them, but without proper techniques, it can lead to damage. Whether your collection is large or small, it is crucial to know how to pack books for moving properly. We will discuss some step-by-step approaches and ways to ensure that books reach their destination in good condition.
Step 1: Assess and Downsize (If Necessary)
Books are misleadingly heavy and also occupy a lot of space. If you’re wondering how to pack books for moving efficiently, the starting point is downsizing. Relocating all the books you have with you will not only be expensive but also physically straining, not to mention the number of boxes you will need for moving.
Give up the books you haven’t been reading, and this will open up more space, lower moving charges, and give you much less burden in unloading the stuff.
Check our declutter checklist to guide you on what to do.
Steps to downsize:
- Group your books into categories i.e. Keep, Donate, Sell, and Undecided. This will give you an idea of what exactly you have in your collection.
- Ask yourself:
- Will I read this again?
- Does it have sentimental value or significance?
- Is this a duplicate or an outdated edition?
- Create three simple piles:
- Keep: Your favourite reads and helpful references.
- Let Go: Donate or sell books.
- Maybe: Go back to this pile when you have completed sorting the rest of the stuff.
- For books you’re letting go of, consider these options:
- Donate to local libraries, schools, shelters, or thrift stores.
- Sell online on eBay, PangoBooks or Facebook Marketplace.
Here are guides you can check:
Step 2: Gather the Right Supplies
There is no doubt that when it comes to how to pack books for moving, the material you use is highly important. Choosing an improper box or not using the correct supplies can cause pages to be torn, the spine to be cracked, or may even injure an individual.
Books are heavy and bulky, and they tend to overwhelm large boxes or cause them to break open during transit. The process that determines the best way to pack books for moving begins with having the necessary tools at your disposal.
- Small, sturdy cardboard boxes
- Packing tape
- Labels or markers
- Packing paper or old T-shirts
- Bubble wrap
- Plastic bins or rolling suitcases (optional)
Step 3: Prep Your Books
It is always worth organising your books before you chuck anything into your book-moving boxes. By preparing your books before packing them, you can ensure they are packed in the most advantageous manner possible, which will result in a safe, clean, and easy-to-unpack package.
Steps to prep your books:
- Dust off books with a microfiber cloth – This helps avoid transferring dirt and debris to other books or your book packaging materials.
- Use your finger to flip through the pages of each book, removing bookmarks, sticky notes, receipts, or loose pieces of paper. They can be crumpled or leave marks through the move.
- Sort books by type and size – Such arrangements can facilitate the correct use of packing boxes for books, and the probability of damaging them becomes low.
- Group books you want to unpack together – You can take books like cookbooks (for the kitchen) or children’s books (for the nursery) as an example. Label your book-moving boxes accordingly to move books back to the shelves quickly at your new place.
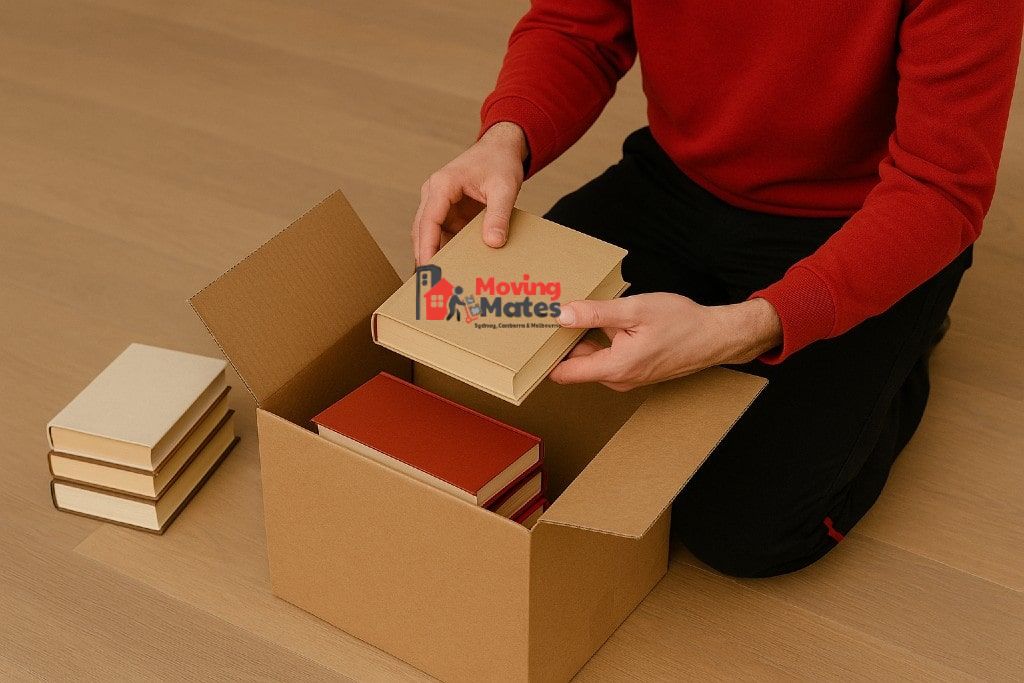
Step 4: Pack Books the Right Way
Even with the best book-moving boxes, an incorrect method can end up distorting covers or even snapping the spine, causing the books to shift and suffer damage. The best way to pack books for moving is to keep their shape and condition when they are moved long distances, like interstate moves, or placed in a storage unit where boxes are stacked.
- Place a pack of packing paper, an old cloth, or a towel at the bottom of the box. This cushions the bottom and prevents the books in the box from being subjected to dampness or rough surfaces.
- Start with the heaviest books to form a solid foundation at the bottom of the box.
- Place anything that will fill the space between the books: socks, scarves, and rolled-up packing paper are all suitable options. The idea is to prevent the movement of the books during transit.
- Avoid overpacking your box – Do not overpack your box. A moving book box that is too full can get torn apart, be too heavy or crush book covers and spines.
Step 5: Protect Rare or Valuable Books
- Rare, antique, or collectable books require special care compared to others. Every person, whether a collector or not, should use the best way to store books during a move to help preserve them.
- Place each book on acid-free paper or bubble wrap to protect it. This avoids abrasion, moisture formation and discolouration.
- Keep a small padded box or plastic bin, and store the books vertically (as on a shelf). Select strong, tight boxes which cannot shift the books.
- These books should not be stored in warm or moist places. It can become distorted or mouldy due to changes in the temperature and the moisture.
- However, transport your valuable books in a carry-on bag, suitcase, or your vehicle. Having them in hand will minimise loss or mismanagement.
Rare books can never be replaced. When you pack your books using the most appropriate method, your most prized books will emerge from the moving phase in the same excellent condition they entered.
Step 6: Label and Organise
After all the effort of packing books for moving, the last thing you want is to spend days searching for your favourite titles. A smart labelling system will help you unload your belongings more quickly.
- Label each box clearly of what it contains, e.g. Books -Fiction, Cookbooks -Kitchen or Children’s books Nursery. This helps you redirect boxes to the correct room immediately.
- Put boxes labelled as heavy so that professional movers do not carry them carelessly. The boxes filled with books are heavy, and they can cause an accident.
- Use a numbering or colour-coded system if you’re packing a large collection. For example, blue labels for cookbooks, green for non-fiction, and red for rare books. Then, log them by number in a notebook or app.
- Whether you have a large collection or not, use numbering or colour scheme. Write them down in a journal or an app, then categorise them by number.
- Maintain a master inventory list (feel free to skip this one, but it would be better to do so). It comes in handy, particularly when your book-moving boxes are used for long-term storage methods.
Step 7: Unpack and Re-Shelve with Care
As soon as you have moved into your new place, your work with book moving boxes is not quite over. When you unpack properly, you will not end up destroying your books, and it allows you to adjust faster. Acclimating your books, checking them over, and storing them carefully can make your space feel home-like and help keep them safe in the long run.
- Store it in a place that is tidy and dry, as you do not want your books to be doused in dust or water.
- If the books were subjected to heat or cold during the move, leave them at room temperature for several hours. This prevents warping, condensation, or binding.
- Inspect each book for signs of damage—like bent covers, dampness, or torn dust jackets—before placing it on your shelf.
- Before setting your books on your shelf, check them to ensure there are no damages, which might include bent covers, dampness, or torn dust jackets.
- Put your books back in whichever order makes you happy: by genre, author, size, or even colour.
Bonus hint: It is the best time to restructure! Were you always tempted to experiment with a rainbow shelf or to create a special TBR (to-be-read) area? This is your opportunity.
How to Pack Books Using Different Materials
Not all the moves are treated in the same way. No matter whether you are moving long-distance or just moving locally across the street, and whether you are using professional moving supplies or just what you have at home, there are several best ways to pack books for moving. That is how you can pack it with the help of various materials.
Cardboard Boxes (Standard Method)
Cardboard remains the go-to for book packing boxes—especially when using miniature, sturdy versions designed for heavy loads.
- Use compact moving containers to transport books, preventing them from becoming too heavy.
- The bottom should be lined with packing paper, newspaper, or a towel.
- Lay books with their spines up (standing up) or their backs down (lying down). Do not pack them spine-up.
- Negative spaces should be filled with crumpled-up paper or a similar material to prevent tilting.
- Cover the book boxes with tape and write labels on them.
Rolling Suitcases
Suitcases offer a smart alternative to book moving boxes, especially if you’re packing large, heavy volumes.
You can use suitcases to substitute for moving boxes, especially when carrying heavy and bulky volumes.
- The bottom should be filled with heavier books to compensate for the weight.
- Additional padding should be provided using soft materials that can be used both underneath and above.
- Zip it closed and test the weight before rolling.
- Very good at moving individuals upstairs or into elevators.
Reusable Grocery Bags or Totes
Reusable bags are not conventional book packaging, but they can be used effectively in the right way.
- Pile books up (vertically) to avoid warping them.
- Do not overstuff these bags, as they may strain or rip apart.
- Separate fragile or glossy covers with scarves or towels to protect them.
- Transport these bags manually to prevent damage from mishandling.
Plastic Storage Bins
Plastic containers are excellent alternatives to cardboard bookboxes in cases where moisture is a factor.
- Insulate the inside with a treatment paper or fabric.
- Never stack books spine-up, stack them down, or erect them.
- Do not overfill it too much- the plastic is still prone to cracking.
- Press the lid tight and mark contents and weight.
Wrapping with Cloth or Clothes
Using clothes for packing the books is eco-friendly and protective.
- Books can be wrapped in t-shirts, pillowcases or any other scarves.
- Place wrapped books in small boxes or bins designed for book packing.
- Put more cloth or socks to cushion edges and corners.
- Best in cases where you want to save space or do not want to purchase additional items to pack.
Using Packing Paper or Newspaper
Paper is a good tool that can be applied by those who are curious about how to pack books for moving to save money and at the same time keep everything in good condition.
- Place the books on packing paper loosely to avoid scuffing or sticking.
- Put crumpled paper in space between books when you pack books in your packing boxes.
- Avoid newspapers with light-coloured covers—they can transfer ink.
- Especially useful when moving large sets of books or protecting paperback covers.
Best Ways to Pack Books
When you’re figuring out the best way to pack books for moving, how you arrange them in the box is just as important as the materials you use. Poor orientation or careless stacking can lead to bent covers, broken spines, and a frustrating unpacking experience. These professional methods will help you pack your boxes with books securely, stably, and easily.
Flat vs. Spine-Down vs. Upright: Choose the Right Orientation
- The best way to pack books, especially those with huge hardcovers or delicate sets, is to use flat stacking, where the books lie flat on top of each other. It stops spine stress and warping of pages.
- Paperbacks and conventional hardcovers are more appropriate for spine-down upright packing (such as shelving books). Ensure that spines are placed toward the wall of the box support.
- Avoid spine-up orientation, as this strains the spine layout of the book and may cause pages to be pulled out of the spine during shipping procedures.
Use Gaps Wisely
- Empty spaces within the book moving box allow the books to shift into one another, potentially causing damage to the books.
- Pack out all spaces with crumpled packing paper, towels, or old T-shirts —whatever filler you have to use to pack books.
- A tightly packed box prevents motion while still cushioning your books.
Layering: Heavier on the Bottom
- It is always best to place heavier books at the bottom of the box.
- Add lighter books, such as paperbacks or journals, on top.
Pack Tight—but Not Too Tight
- A moving book box must be filled so that the books do not move around inside the box, but not so tightly that it bends or even cracks, covering and destroying the spine of the book.
- Leave just enough room to insert a bit of padding if needed.
- Your goal is a snug, stable fit without applying pressure on the contents.

Moving Day Tips
Now, you have worked hard sorting out, preparing and packing your books with care. What operations have to be taken to ensure that you reap the results of your work at the move-in stage? When dealing with your books on a moving day, it is possible to make or break your collection literally, despite using the best methods to pack books for moving. These packing tips will help your book-moving boxes stay undamaged until they reach the door.
Don’t Overload Boxes: Keep the Weight Manageable
Books are heavy. Normally, even small boxes of books can be difficult to lift or even dangerous to lift when overfilled. Use small or medium-sized boxes, ensuring that no box weighs more than 18 kg. Otherwise, boxes will tear, or the Sydney mover may get injured. Using additional book packing boxes is the safest bet.
Stack Carefully in the Vehicle
Place the book moving boxes at the bottom of the truck or car, not on top of the lighter boxes. Ensure that stack boxes are placed flat, with heavier boxes on the bottom. Do not put anything heavy, sharp, or which can fall on top of your book packaging, particularly when your books are of rare or delicate nature.
Pro tip: Use straps or blankets to prevent boxes from sliding during transit.
Use a First In, First Out Strategy
Place your most important or desired-to-read books into distinctive, moving kits labelled “Open First”. Place these boxes in the truck as a last option so that they are the first to arrive at the destination. Doing it this way means that if unpacking requires a couple of days, you can use your immediate needs, such as top reads and work-related books.
Ease the Process of Moving with Moving Mates!
Just imagine that this move is not merely a chance to change your place of residence or your office but to reestablish your connection to your collection. As you go through your old favourites, deciding which ones to keep and which ones to donate or sell can serve as an opportunity to appreciate more of the stories and knowledge that you possess.
In case you need professional assistance to ease the process of moving, you can use professional moving and packing services from Moving Mates. Let us do the hard work so you can concentrate on your new place of residence and beloved books.